FF1600 standing starts: dialing in the Dual Clutch
There are several ways to do a standing start. The easiest one that gives a strong and repeatable launch is to set a bite point: the clutch position your clutch is dropped to at launch. You can use it with the dual clutch paddles on your wheel (if supported), or with a single clutch using iRacing’s launch control and bite point.
Set the bite point too high and the clutch slips — the car accelerates slower than it could; set it too low, the RPM drops and the engine loses power. We measured over six hundred clutch-drop launches to find the right value, how conditions move it, and a simple RPM check to find it on any track.
Data does not lie: the takeaway
For the FF1600, the optimal bite point is between 42 and 49.
To find it, perform one test launch and read the lowest engine RPM reached after the clutch release. Between 2200 and 2800 you are optimal. As a rule of thumb, glance at your RPM, and if you can see your RPM starting with “2” for just a fraction of second, but never starting with “1”, you are optimal.
The setting is deterministic but unpredictable. So when you join a race, you can’t know what the optimal bite point is. Read below for more details.
A safe “set once and forget” bite point is 44. Over the first 80 meters you would typically lose 0.7 m, and 2.2 m in the worst case.
Agree, disagree, have data of your own? Join the discussion on Discord.
Every launch behind this article is available here: browse the full data — the complete temperature sweep, every setting at every temperature, followed by the earlier run-by-run sessions at Virginia and Mosport.
The cost of setting the wrong bite point
A wrong bite point can easily cost one to three tenths by the end of 1st gear alone — enough to lose (or gain) a position into the first corner.
A far-off guess
At Virginia, where the optimal bite point is 45, let's see the actual cost of guessing it wrong. The gap and speed are measured 5.23 s after the clutch release (~ 0.4s before the shift to 2nd gear):
| Bite point | Time lost vs 45 | Min RPM | Gap after 5.23 s | Speed after 5.23 s | What happens |
|---|---|---|---|---|---|
| 30 | +0.13 s | ~750 | 3.7 m behind | 99.5 km/h | Anti-stall intervenes to stop the engine stalling |
| 40 | +0.06 s | 990 | 1.7 m behind | 100.9 km/h | Too aggressive — deep RPM drop, the engine loses power |
| 45 | fastest | 2260 | reference | 102.5 km/h | Optimal |
| 50 | +0.32 s | 5810 | 8.7 m behind | 96.0 km/h | Far too soft — the clutch slips and the car creeps off the line |
The conclusion is clear: a far-off guess loses meters before the first corner. Don’t guess it, you need at least a rough idea of the right value before the start.
1–2 clicks off
Now let's see the actual cost of being just 1–2 clicks off the optimal, after the same 5.23 s:
| Bite point | Time lost vs 45 | Min RPM | Gap after 5.23 s | Speed after 5.23 s | Assessment |
|---|---|---|---|---|---|
| 43 | +0.024 s | 1510 | 0.7 m behind | 101.7 km/h | Slightly too aggressive |
| 44 | +0.011 s | 1810 | 0.3 m behind | 102.1 km/h | Near-optimal |
| 45 | fastest | 2260 | reference | 102.5 km/h | Optimal |
| 46 | +0.007 s | 3090 | 0.2 m behind | 102.7 km/h | Near-optimal |
| 47 | +0.048 s | 4120 | 1.4 m behind | 102.2 km/h | Slightly too soft |
For a standing start 0.7 m is already significant — it is the difference between having overlap and claiming the inside line into the first corner, or having to stay behind. And these numbers cover 1st gear only: a wrong setting leaves you behind and slower, so the gap keeps growing along the first straight.
The general case
The tables above are one session, at one track, in one condition. We then measured the same thing across 26 track temperatures at Rudskogen, from 64 to 89 °F, with a full sweep of settings 41 to 49 at each one. The gap is measured over the 83 meters to the end of 1st gear, against the optimal setting for that temperature:
| Clicks off the optimum | Average gap | Worst gap |
|---|---|---|
| −3 | 1.08 m | 1.26 m |
| −2 | 0.67 m | 0.86 m |
| −1 | 0.31 m | 0.77 m |
| optimum | reference | reference |
| +1 | 0.41 m | 1.23 m |
| +2 | 1.96 m | 3.01 m |
| +3 | 4.34 m | 5.71 m |
Not every temperature allows three clicks either side within the 41–49 range, so the outer rows are measured on fewer launches (19 to 24) than the inner ones (24 to 26).
Note also the asymmetry: a value too high costs more than the same error too low — 1.96 m two clicks above the optimum against 0.67 m two clicks below, averaged over the 26 temperatures. When unsure, choose one click below the optimum, especially if track conditions might have changed between your practice run and the actual race start.
Find the optimal bite point for any car using Enduro Manager
The measurements in this article were made with Enduro Manager, and you can repeat them for any car.
In a test session, get to the grid, reset, launch, reset, and launch again as many times as you want. Then analyze your results using Lap Compare.
Enduro Manager detects each reset and splits your telemetry into resets (ex: L1r2 for your second reset on lap 1). Enduro Manager also detects standing starts: the time delta starts at the clutch release, so launches line up with each other and can be compared.
The “standing start” layout in Lap Compare
Lap Compare ships with a standing start layout: clutch, RPM, time delta, speed delta, etc. Time Delta is what shows you which launch was faster. You can then look at the RPM chart to see what an optimal launch looks like. — that link opens the app; get Enduro Manager if you do not have it yet.
View this standing start telemetry — 8 launches compared
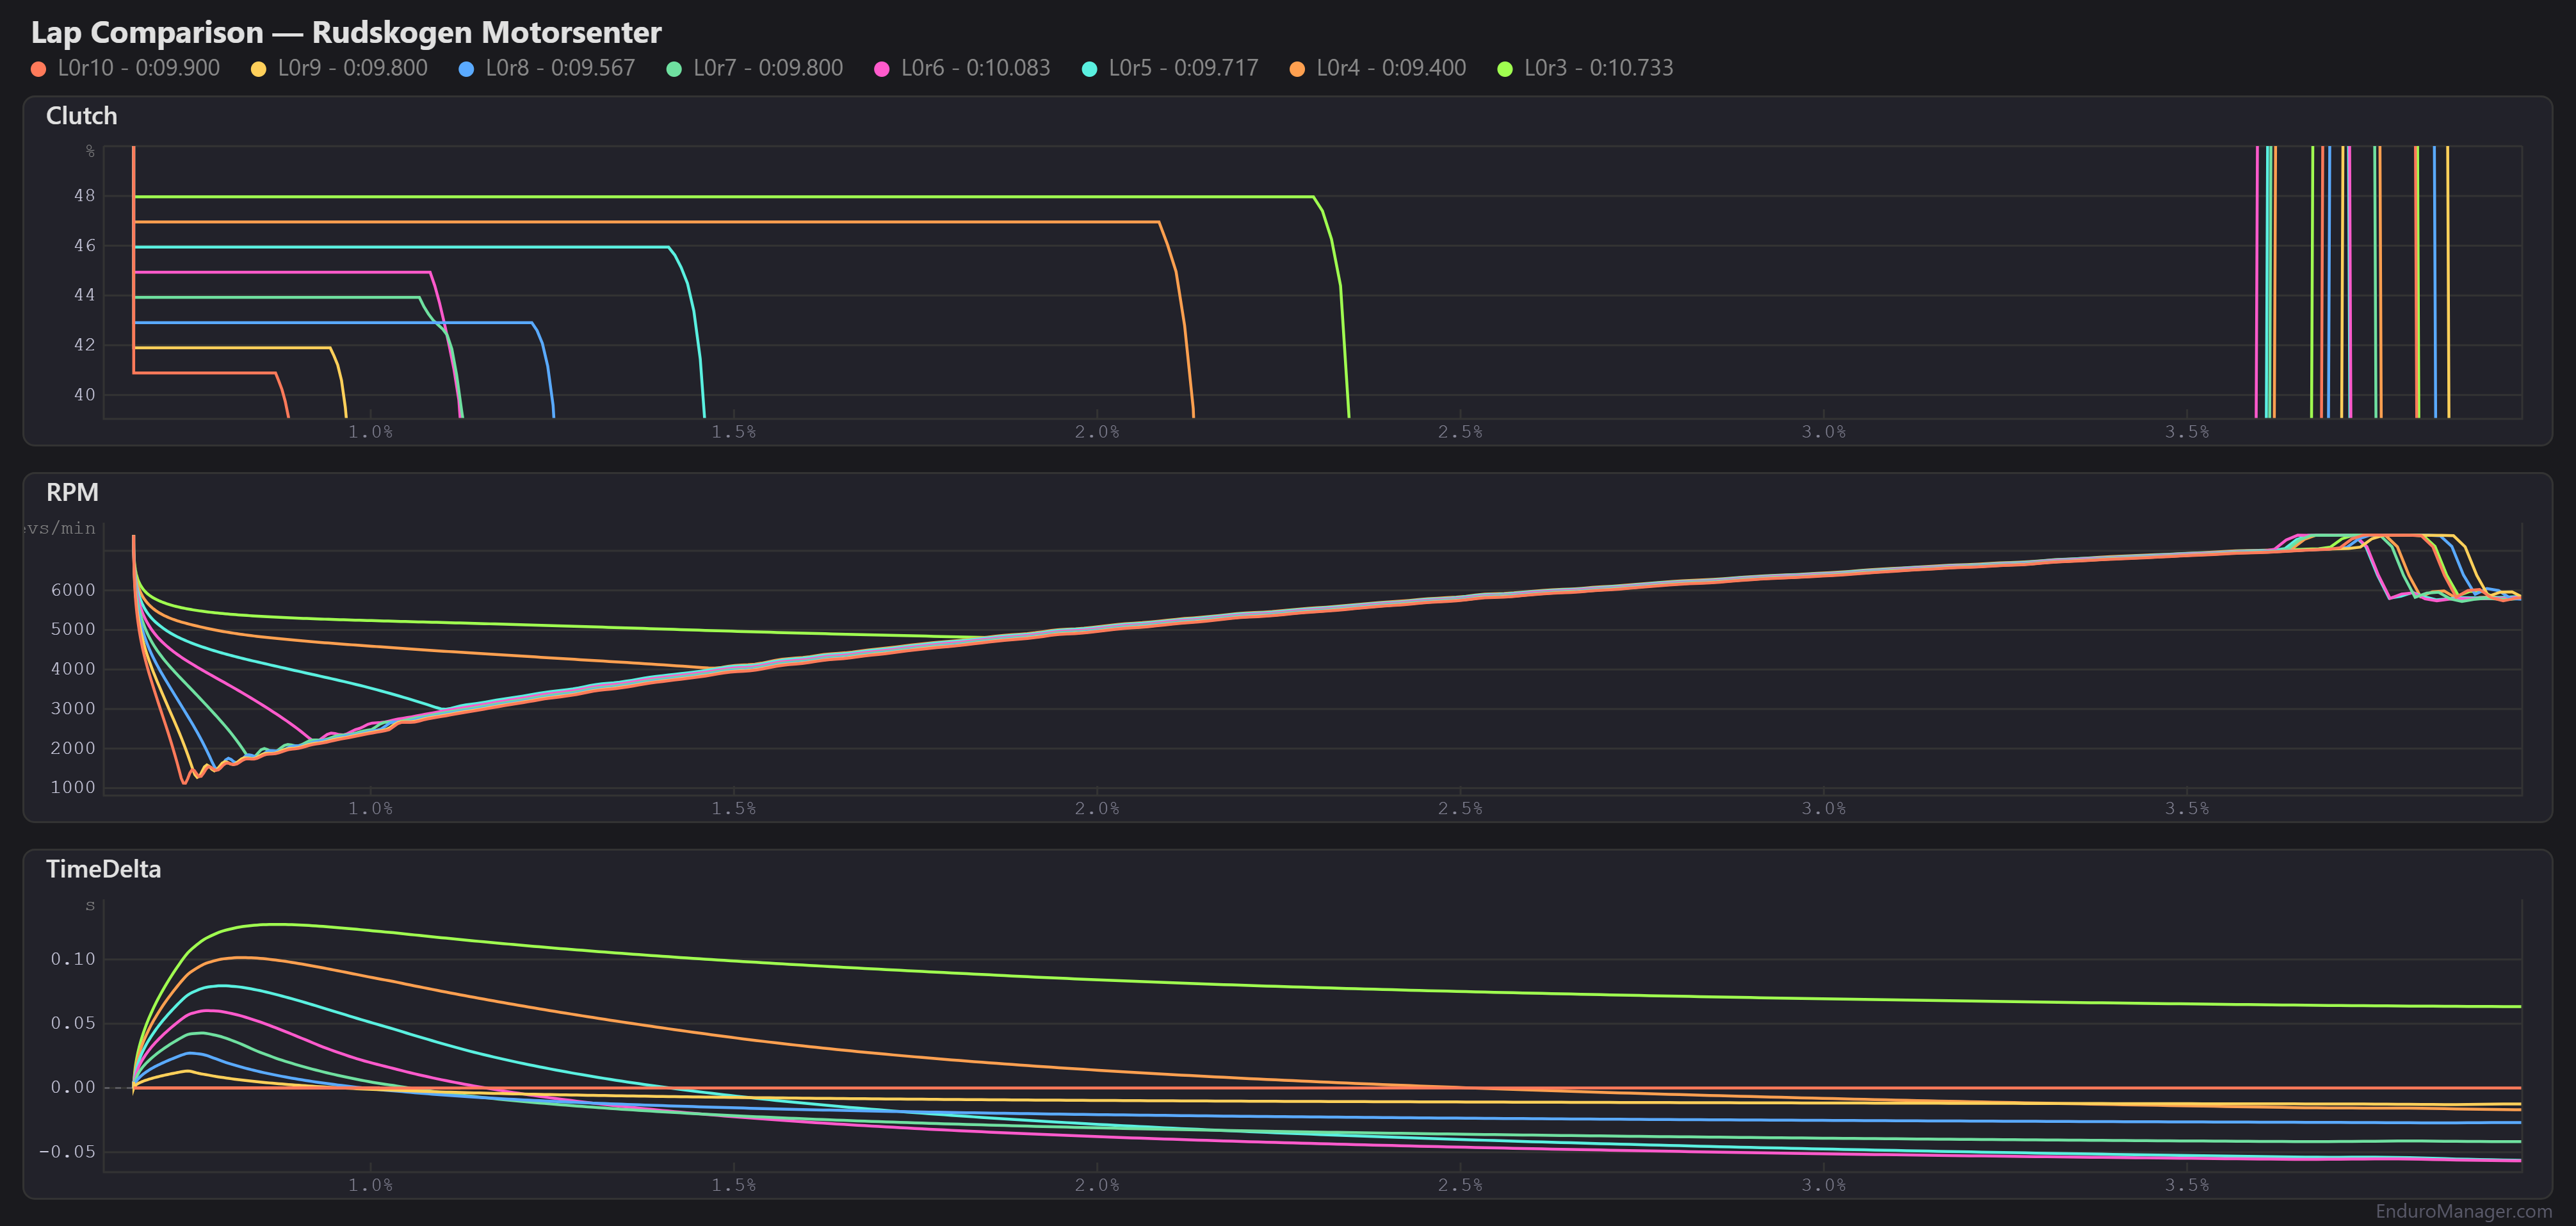
In this example:
- 41 is the reference (in red — Lap 0 reset 10)
- bite points 42 to 47 are all faster than 41, and 48 is much slower with +0.065 s
- bite point 45 (in pink — Lap 0 reset 6) is fastest with −0.055 s, tied with 46 (−0.053 s)
In this example, we can conclude that the optimal bite point is 45.
Temperature changes the optimal bite point a lot — and it’s not predictable
We measured 274 standing starts at Rudskogen: settings 41 to 49, at 26 track temperatures from 64 to 89 °F, one degree at a time. Same car, same setup, same gear stack, same grid box, same time of day, clear sky, 0% humidity, clean track. Only the temperature changed.
The optimal setting at each track temperature
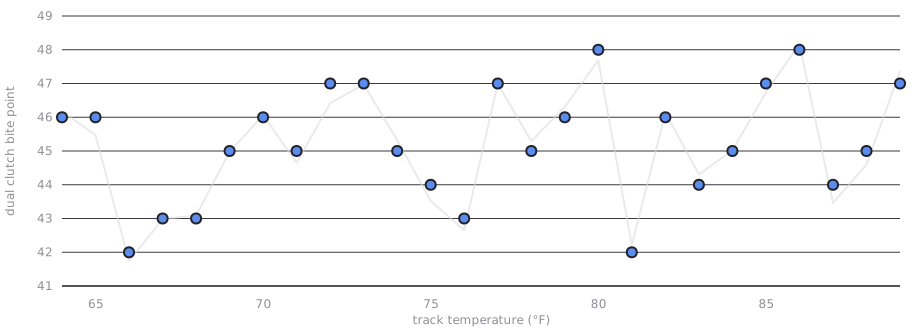
The optimal bite point moved between 42 and 48 with no trend. Two temperatures one degree apart can need bite points five clicks apart: at 80 °F the optimum is 48, at 81 °F it is 42.
The results are repeatable. The same temperature tested in different sessions gives the same minimum RPM within 5 RPM. The optimal bite point is determined by the conditions — it is simply not predictable from those conditions.
Humidity moves it as well, and not in a fixed direction: in one of our tests, going from 0 to 100% humidity moved the optimum 2.2 clicks up at 75 °F, and 1.5 clicks down at 80 °F.
We checked three other tracks at matched temperatures. Each shows the same swing between those temperatures. In identical conditions, the optimal settings also differed between tracks.
Because temperature alone moves the optimum by several clicks between neighboring degrees, there is no point in measuring what the other factors contribute: a race one degree warmer than your practice session can take the optimum from 48 to 42 on its own.
Why does this happen? We have no explanation, and no physics phenomenon explains what we measured.
Our hypothesis, and it is only a hypothesis: the conditions do not change the physics of the launch much. iRacing introduces the variability on purpose, so that a fast launch cannot be achieved by reading a bite point from a table, and a strong start still requires precise clutch control. At one temperature, 44 behaves like 41 would, and at another like 47.
The guideline: do not memorize the bite point — use the minimum RPM
This is the part that works on every track and in every condition. Across every track and condition we have measured, the fastest launch always reaches roughly the same minimum RPM: about 2200–2800. What changes, between tracks and between conditions, is which bite point produces it. Instead of memorizing per-track values, perform one test launch and read the minimum RPM from your telemetry:
| Min RPM | Diagnosis | Correction |
|---|---|---|
| 4000+ | Far too soft — the clutch slips, the car accelerates slowly | Lower the bite point 2–3 steps |
| ~3000 | Slightly too soft | Lower it 1 step |
| 2200–2800 | Ideal range | Keep it |
| ~1800 | Slightly too aggressive | Raise it 1 step |
| Below 1500 | Too aggressive | Raise it 2–3 steps |
| ~750 | Anti-stall intervention | Raise it several steps |
The easiest way is to review your minimum RPM in Enduro Manager after a test launch and set the bite point from there. You can also read it live off the tachometer during the launch — but stay sharp, the minimum only shows for a fraction of a second. And with some practice you will not need to look at all: the depth of the RPM drop is distinct enough to judge by ear.
Can we start even faster?
Yes. The Dual Clutch is a simplified way to launch: it holds one fixed engagement point for the whole start. But as this article shows, the optimal bite point cannot be known before a race — so clutch modulation is the only way to aim for the fastest possible start. A driver modulating the clutch manually through the launch — feeding it in progressively to keep the engine in its maximum-torque range the entire time — would accelerate better than any single fixed point can. But it is much harder to execute, and far harder to repeat under pressure on the grid.
Agree, disagree, want a track measured next? Join the discussion on Discord and bring your own data.